This came up in troubleshooting how S/MIME plays into email encryption for Business users. Valuable to understand the behind the scenes of how email encryption works so we can help our customers understand when they go to click the wrong way of encrypting their emails as a Premium user 🙂
Short and sweet – there are two ways to encrypt emails in Outlook, and only one is the one we’d really want to recommend for maximum useability, but that users have the option to select if they don’t know better:
Default recommendation, and the one we’re used to:
New Message > Options > Encrypt > Encrypt
This encrypts emails on the server level and lets servers authenticate senders and recipients to allow the recipients to actually read the email more readily.
Not recommended because way more work on sender and recipient end to allow recipient to actually read the email
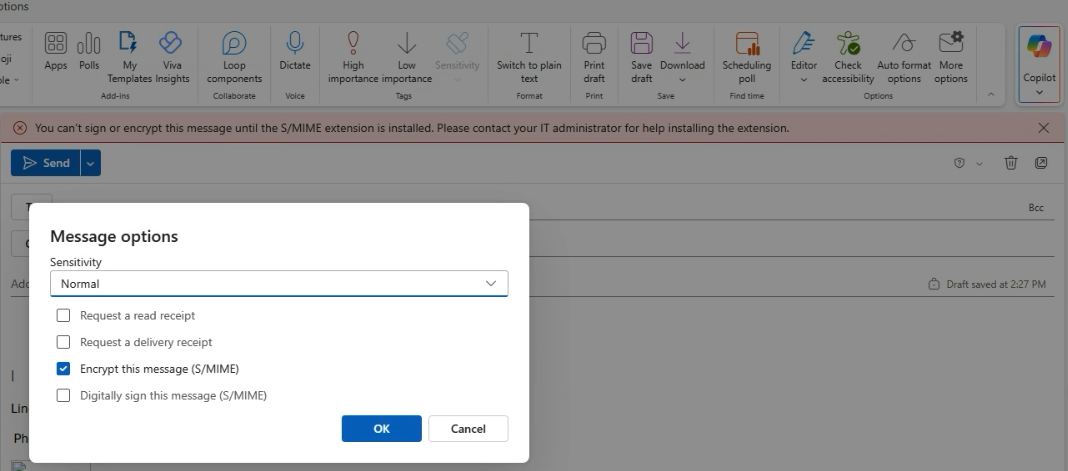
New message > More Options > Encrypt with S/MIME and Digitally sign with S/MIME
Encrypting with S/MIME, if not configured properly (and likely with Microsoft’s help) will error out like in the image above, and will also require the recipient to have configured S/MIME certs on their end in order to actually read the email.
If you run into this, that’s the gist of why we wouldn’t want to recommend option 2 🙂 way more hassle for not a lot of extra payoff unless an org is getting extra serious about their ability to verify the sender/recipient.
🧰 Ultrex IT – Low Voltage Bid Process (Backup Vendor)
Purpose
To streamline how we gather and send information to LTT Partners (Harper Wimble’s team) or other low-voltage vendors for cable run bids—especially when no walkthrough is needed.
Goal: To request bids for low voltage runs (cameras, access control, etc.) without needing an on-site walkthrough by providing complete documentation, photos, and videos.
2. Preparation Before Requesting a Bid
✅ Gather Required Information
Make sure you collect and/or create the following materials:
PDF floor plans of the building
If available, mark up with:
Camera locations
Door access control points
Any other wire run endpoints
Photos and videos
Walk through each area where runs will go
Show key locations (IDF, ceiling type, entry points, etc.)
Picture of IDF (network closet)
Show racks, switches, and available ports
Note ceiling type (e.g., drop ceiling, drywall, open industrial)
Confirm if lift is needed (based on ceiling height or access)
Document mounting heights
Interior cameras
Exterior cameras
Identify system type
Which camera or access control system is being installed (e.g., UniFi Protect, Verkada, etc.)
Doors requiring electrification
List which doors will need power for access control
Preferred wire path runs (if known)
Example: “Follow HVAC chase” or “Run through plenum ceiling above hallways”
Switch information
Note if there’s an open switch port or if they’ll need to provide one
Installation hours
Confirm if there are preferred or restricted working hours
Drilling requirements
Note surfaces like brick, sheetrock, concrete, etc.
Device onboarding responsibility
Confirm whether Ultrex IT or the vendor handles final setup/configuration
This article shows you how to install and configure RustDesk, an open-source remote access tool. It’s used to remotely control or access client or internal computers for support or management purposes.
When to Use
Use this guide when setting up a new device for remote support via RustDesk — either for internal use (Ultrex techs) or when helping a client establish a connection for remote service.
Overview: What Is RustDesk?
RustDesk is a secure, open-source remote desktop solution that allows remote access and control of another computer. It’s a great alternative to TeamViewer or AnyDesk, providing:
Easy remote access for IT support.
Secure connections with optional 2FA.
Full desktop control from anywhere.
We’ll cover setup on both ends:
Destination computer – the system being controlled.
Source computer – the system used to connect remotely.
Step 1: Install RustDesk on the Destination Computer
You’ll be redirected to RustDesk’s GitHub releases page. Under the Windows column, download the file marked .MSI.
Once downloaded, open the file and proceed with installation:
Click Next through the prompts.
Accept the license agreement.
Click Finish when done.
RustDesk will launch automatically. You’ll see your computer’s unique ID on the left-hand side — record this ID, as it will be needed to connect.
Step 2: Configure Security Settings
Set a Permanent Password
Click the three dots next to your computer’s ID and select Settings.
Go to the Security tab.
Click Unlock to enable editing.
Scroll to Password Options → select Use Permanent Password.
Create a strong, unique password (you can use passgen.co to generate one).
Enter it in both fields and click OK.
Enable Two-Factor Authentication (Optional)
Still in the Security tab, check Enable 2FA.
Scan the displayed QR code with an authenticator app (Google Authenticator or Microsoft Authenticator are both fine).
Enter the six-digit code from the app to finalize setup.
Tip: If you’re not already using an authenticator app, Google Authenticator is quick and easy to set up.
Step 3: Install RustDesk on the Source Computer
Repeat the same installation process on the computer you’ll be connecting from.
Once installed:
Open RustDesk.
In the Control Remote Desktop field, enter the destination computer’s unique ID.
Click Connect.
Enter the permanent password set earlier. Optionally check Remember password for future use.
If 2FA is enabled, enter your six-digit authentication code to complete the connection.
Tips for Reliable Remote Access
Keep the destination PC awake and online. RustDesk requires it to stay powered on and connected to the internet.
Trust devices selectively. Only check “Trust this device” on private computers — never on public or shared systems.
Be aware of visibility. Actions performed while connected are visible on the destination’s monitor if it’s on.
Troubleshooting
If RustDesk fails to connect or shows a timeout:
Ensure both devices are online.
Verify the ID and password are correct.
Restart the RustDesk service or the app on both devices.
If issues persist, Ultrex IT retainer clients can contact support for remote troubleshooting assistance.
Recap / Key Takeaways
RustDesk provides a free, secure, and simple way to connect remotely to computers — ideal for both internal management and client support. With optional 2FA and permanent password setup, it balances ease of use with strong security.
Use this setup as a standard procedure when enabling remote access for clients or internal systems.
If you need to export emails from a Microsoft 365 tenant using the Microsoft Purview compliance portal, follow these steps:
Step 1: Assign eDiscovery Permissions
Ensure your account has the necessary permissions by adding it to the eDiscovery Manager role group.
In the Microsoft Purview compliance portal, navigate to Permissions > Email & collaboration roles > Roles, and select the eDiscovery Manager role group.
Add your account to the eDiscovery Administrator list. NOTE: You need to have Business Premium / Office E3 or higher to allow for actual eDiscovery exports.
Verify that the Export role is assigned to this role group.
Note: Changes in permissions might take up to 24 hours to apply.
Step 2: Create a Content Search
In the compliance portal, go to Content search and select New search.
Provide a name and description for the search.
Under Locations, enable Exchange mailboxes and select the mailboxes you wish to export.
To export all emails, leave the Conditions section empty.
To export only a specific date range, add a Condition for “Received” and select before, after, or between certain dates
Submit the search and wait for it to complete.
Step 3: Export Search Results
Once the search is complete, select it from the list and choose Export results.
In the export options:
Under Output options, select All items, including ones that have unrecognized format, are encrypted, or weren’t indexed for other reasons.
Under Export Exchange content as, choose One PST file for each mailbox and can likely leave the default selections. Read them carefully though.
Start the export process. Note: This can take over an hour to export depending on the size of export you’re doing.
Step 4: Download the Exported PST Files
After the export job is prepared, navigate to the Exports tab in the compliance portal.
Select your export job and copy the Export key.
Click Download results, which will prompt you to install the eDiscovery Export Tool if it’s not already installed.
In the eDiscovery Export Tool, paste the export key and specify the download location on your local computer.
Microsoft has made an update in Windows 11 in an update. Windows 11 version 24H2.
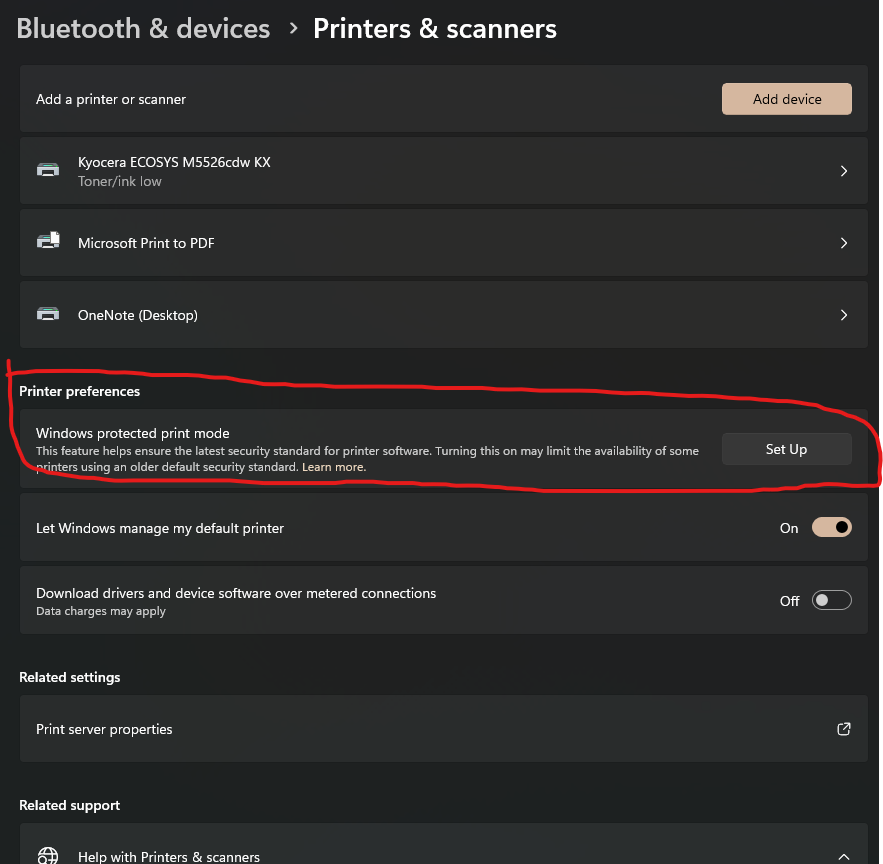
Windows Protected Print Mode (WPP) is a driver‑free, security‑focused printing mode in Windows that relies solely on the modern IPP (Internet Printing Protocol) stack and Mopria‑certified printers—eliminating third‑party drivers.
This eliminates the ability to use print drivers that don’t use IPP and makes TCP/IP unavailable completely.
Microsoft as started to enable this by default on some newer PC’s.
If you have any print drivers that fail to install check here
Settings>Bluetooth and Devices>Printers and Scanners. Make sure it’s off.
For windows machines running Windows 11 24H2 version. There are instances where RDP works on the first login and then freezes on subsequent logins. The following adjustment on the Host machine the user is connecting to fixes this issue.
Go to Gpedit.msc then take the following path
Local Computer Policy> Computer Configuration > Administrative Templates > Windows Components > Remote Desktop Services > Remote Desktop Session Host > Connections > Select network detection on the server – set to Enabled, Turn off Connect Time Detect and Continuous Network Detect
Make sure to hit apply and restart the device to ensure it takes.
Here’s a cleaned-up, polished version of your article—formatted professionally for your company’s Knowledge Base while keeping it practical and technical:
📘 Mapping Network Drives via Group Policy in Windows Server 2022
Overview
This guide explains how to automatically map shared network folders as drives using Group Policy Preferences (GPP) on Windows Server 2022. It also covers the roles of Organizational Units (OUs) and Security Groups, along with best practices for scalable, flexible management.
🔧 Key Components & Requirements
Before proceeding, ensure the following:
Windows Server 2022 domain environment
Domain-joined client systems
Users and computers are located in Organizational Units (OUs) (not default containers)
Shared folders with proper NTFS and share permissions
🧩 Understanding OUs vs. Security Groups
Concept
Description
Organizational Units (OUs)
Logical containers for users, computers, and other OUs. They support GPO linkage and delegation of administrative rights.
Security Groups
Membership-based collections used for granting permissions (NTFS, shares) and GPP item-level targeting.
Key Differences:
A user or computer can reside in only one OU at a time.
Users can belong to multiple security groups simultaneously.
OUs apply policies broadly and help delegate control.
Groups grant granular access control and can span across OUs.
⚠️ Important: Default containers like Users and Computersdo not support GPOs. Move all accounts into proper OUs for Group Policies to apply.
🏗️ Active Directory Structure Best Practices
a. Create Organizational Units
Method 1 – ADUC GUI:
Open Active Directory Users and Computers (ADUC).
Right-click the domain → New → Organizational Unit.
Name and optionally protect the OU from accidental deletion.
✅ Remove this item when it is no longer applied – automatically unmaps drives when users leave a group.
🔁 Apply once and do not reapply – useful for one-time setups.
This allows one GPO to deploy multiple drive mappings, each targeted to different security groups, across any OU.
🔗 Linking and Applying the GPO
Link the GPO to the desired OU(s) or domain root.
On clients, run:
gpupdate /force
or simply reboot.
Users who:
Have their account within the linked OU, and
Belong to one of the targeted Security Groups
will automatically receive the appropriate mapped drives.
🧰 Maintenance & Troubleshooting
Verify GPO scope:
gpresult /h report.html
or use
Get-GPOReport
Adjust mappings by changing security group membership, not by moving users between OUs.
Keep GPOs modular—avoid editing the Default Domain Policy.
Use Item-Level Targeting to minimize GPO clutter and boost performance.
📋 Summary Table
Task
Tool / Method
Notes
Create OU
ADUC / PowerShell
New-ADOrganizationalUnit
Move Accounts
ADUC / PowerShell
Move-ADObject
Create Security Group
ADUC
Add users, define scope
Link Drive-Mapping GPO
GPMC
User Config → Preferences → Drive Maps
Configure Mapped Drive
GPP + Targeting
Set UNC, drive letter, group conditions
Enable Cleanup Options
Within preference item
Use “Remove this item…” / “Apply once…”
Apply / Test Policy
Command line
gpupdate / gpresult
Maintain Setup
ADUC / PowerShell
Adjust memberships, review policies
💡 Final Thoughts
A user belongs to one OU, but can be part of many groups. Using Item-Level Targeting with Security Groups enables flexible, modular, and scalable GPO management across OUs.
This approach:
Simplifies administration
Reduces GPO sprawl
Keeps drive mappings logical and maintainable
Tip: Combine OUs for structure and Groups for control. That balance keeps your environment clean, efficient, and easy to scale.
Would you like me to format it for Markdown, Confluence, or SharePoint export? I can adjust the headings and table syntax accordingly.