Microsoft has made an update in Windows 11 in an update. Windows 11 version 24H2.
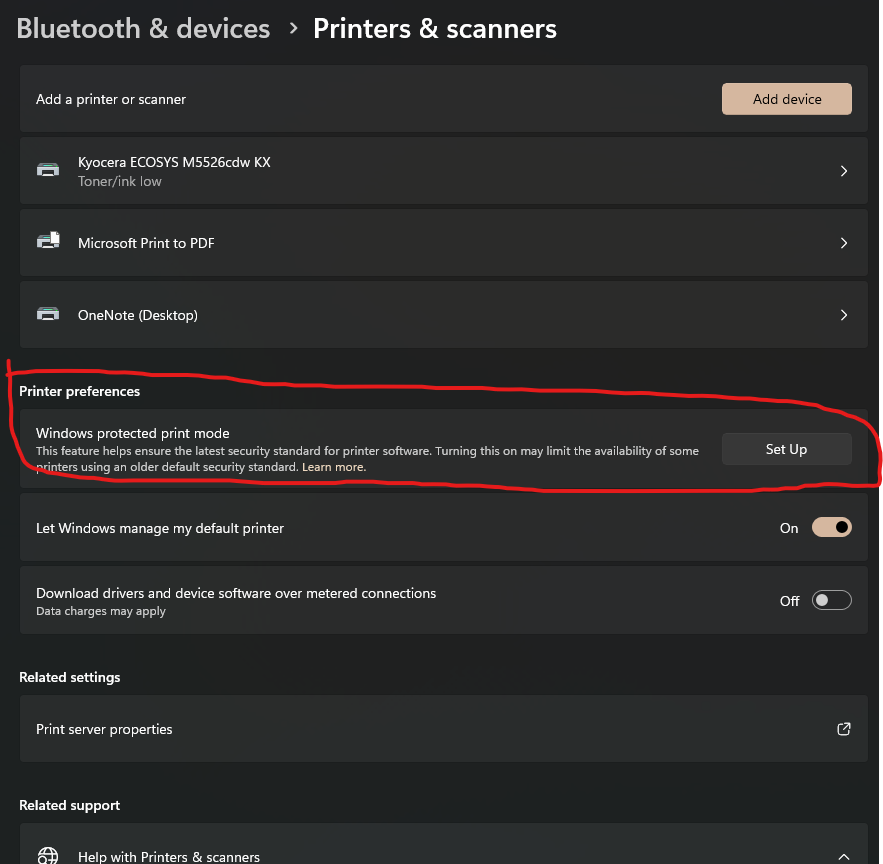
Windows Protected Print Mode (WPP) is a driver‑free, security‑focused printing mode in Windows that relies solely on the modern IPP (Internet Printing Protocol) stack and Mopria‑certified printers—eliminating third‑party drivers.
This eliminates the ability to use print drivers that don’t use IPP and makes TCP/IP unavailable completely.
Microsoft as started to enable this by default on some newer PC’s.
If you have any print drivers that fail to install check here
Settings>Bluetooth and Devices>Printers and Scanners. Make sure it’s off.
Here’s a cleaned-up, polished version of your article—formatted professionally for your company’s Knowledge Base while keeping it practical and technical:
📘 Mapping Network Drives via Group Policy in Windows Server 2022
Overview
This guide explains how to automatically map shared network folders as drives using Group Policy Preferences (GPP) on Windows Server 2022. It also covers the roles of Organizational Units (OUs) and Security Groups, along with best practices for scalable, flexible management.
🔧 Key Components & Requirements
Before proceeding, ensure the following:
Windows Server 2022 domain environment
Domain-joined client systems
Users and computers are located in Organizational Units (OUs) (not default containers)
Shared folders with proper NTFS and share permissions
🧩 Understanding OUs vs. Security Groups
Concept
Description
Organizational Units (OUs)
Logical containers for users, computers, and other OUs. They support GPO linkage and delegation of administrative rights.
Security Groups
Membership-based collections used for granting permissions (NTFS, shares) and GPP item-level targeting.
Key Differences:
A user or computer can reside in only one OU at a time.
Users can belong to multiple security groups simultaneously.
OUs apply policies broadly and help delegate control.
Groups grant granular access control and can span across OUs.
⚠️ Important: Default containers like Users and Computersdo not support GPOs. Move all accounts into proper OUs for Group Policies to apply.
🏗️ Active Directory Structure Best Practices
a. Create Organizational Units
Method 1 – ADUC GUI:
Open Active Directory Users and Computers (ADUC).
Right-click the domain → New → Organizational Unit.
Name and optionally protect the OU from accidental deletion.
✅ Remove this item when it is no longer applied – automatically unmaps drives when users leave a group.
🔁 Apply once and do not reapply – useful for one-time setups.
This allows one GPO to deploy multiple drive mappings, each targeted to different security groups, across any OU.
🔗 Linking and Applying the GPO
Link the GPO to the desired OU(s) or domain root.
On clients, run:
gpupdate /force
or simply reboot.
Users who:
Have their account within the linked OU, and
Belong to one of the targeted Security Groups
will automatically receive the appropriate mapped drives.
🧰 Maintenance & Troubleshooting
Verify GPO scope:
gpresult /h report.html
or use
Get-GPOReport
Adjust mappings by changing security group membership, not by moving users between OUs.
Keep GPOs modular—avoid editing the Default Domain Policy.
Use Item-Level Targeting to minimize GPO clutter and boost performance.
📋 Summary Table
Task
Tool / Method
Notes
Create OU
ADUC / PowerShell
New-ADOrganizationalUnit
Move Accounts
ADUC / PowerShell
Move-ADObject
Create Security Group
ADUC
Add users, define scope
Link Drive-Mapping GPO
GPMC
User Config → Preferences → Drive Maps
Configure Mapped Drive
GPP + Targeting
Set UNC, drive letter, group conditions
Enable Cleanup Options
Within preference item
Use “Remove this item…” / “Apply once…”
Apply / Test Policy
Command line
gpupdate / gpresult
Maintain Setup
ADUC / PowerShell
Adjust memberships, review policies
💡 Final Thoughts
A user belongs to one OU, but can be part of many groups. Using Item-Level Targeting with Security Groups enables flexible, modular, and scalable GPO management across OUs.
This approach:
Simplifies administration
Reduces GPO sprawl
Keeps drive mappings logical and maintainable
Tip: Combine OUs for structure and Groups for control. That balance keeps your environment clean, efficient, and easy to scale.
Would you like me to format it for Markdown, Confluence, or SharePoint export? I can adjust the headings and table syntax accordingly.
a. If you are installing the operating system on a computer configured for RAID or AHCI
mode, you may pre-install the Intel(R) Rapid Storage Technology driver using the
“F6” (Load Driver) installation method described in section 6.3 below.
b. If you’re installing the operating system on a computer configured for ‘Intel(R) Smart
Response Technology’ or ‘System Acceleration with Intel(R) Optane(TM) Technology’, you
must pre-install the Intel(R) Rapid Storage Technology driver using the
“F6” (Load Driver) installation method described in section 6.3 below. The Intel(R) RST pre-OS version must support the Intel(R) RST technology that you are installing to.
c. To install Intel(R) Rapid Storage Technology from within the OS during runtime,
double-click on the self-extracting and self-installing setup file and answer all
prompts presented.
6.2 Intel(R) RST Windows Automated Installer*. Installation from HDD, USB, or CD-ROM
Note: This method is applicable to computers configured for RAID or AHCI mode.
a. Obtain the Intel(R) Rapid Storage Technology setup file name: SetupRST.exe and
double-click to self-extract and to begin the setup process.
b. The Welcome window appears. Click ‘Next’ to continue.
c. For systems running in RAID mode, the Uninstallation Warning window appears. You will
not be able to uninstall the driver in this mode. Click ‘Next’ to continue.
d. The Software License Agreement window appears. If you agree to these terms, click the
check box then click ‘Yes’ to continue.
e. Select the check box to install Intel(R) Optane(TM) Memory and Storage Management application if required then click ‘Next’ to continue.
f. If the Windows Automated Installer* Wizard Complete window is shown without a prompt
to restart the system, click ‘Finish’ and proceed to step “g”. If it is shown with a
prompt to restart the system, select ‘I want to restart my computer now.’
(selected by default) and click ‘Finish’. Once the system has restarted, proceed to
step “g”.
g. To verify that the driver was loaded correctly, refer to section 7.
6.3 Pre-Installation of INTEL(R) RST driver using the “Load Driver” Method.
a. Extract driver files from SetupRST.exe:
– Open terminal in the directory with SetupRST.exe by right-clicking the directory
and selecting “Open in Terminal” or “Open PowerShell here”
– Enter the following command:
./SetupRST.exe -extractdrivers SetupRST_extracted
b. Copy all driver files from the SetupRST-extracted to a USB key media.
c. For Microsoft Windows OS*:
– During the operating system installation, after selecting the location to install
Windows, click ‘Load Driver’ to install a third party SCSI or RAID driver.
d. When prompted, insert the USB media and press Enter.
e. Follow the prompts and browse to the location of the installation files. Select the
appropriate ‘.inf’ file (64 or 32 bit). If a supported controller is detected there
will be no error message. Follow prompts to continue and complete the installation.