If you receive a notification about a quarantined email, follow these steps to determine if it is safe to release:
Check the sender’s email address carefully. Ensure it matches the expected domain.
Verify if you were expecting an email from that sender.
Access the CAS Admin Portal to review the quarantined email:
Log in to the CAS Admin Portal.
Navigate to Quarantine > Quarantine Items.
Find the email in question and click on the subject header.
Review the Security Stack on the right side to see the analysis of the email.
Check for any flagged attachments and their details.
If an attachment is flagged as potentially malicious, do not release the email immediately.
Consider downloading the attachment to an isolated computer with strong antivirus software to scan it for threats.
Based on the scan results, decide whether to release the email or not.
Always exercise caution when dealing with quarantined emails, especially if they contain attachments. If in doubt, consult your IT support team for further assistance.
I spoke with Andrae and during the call we discussed the allow rule needed to be created. He mentioned it would be a penetration test-like event from the internet needing inbound access, but despite there being no inbound access rules existing for CISA he mentioned there was never any reports of the tests not working in the past.
We created address objects for the CISA IPs listed and then added them to a group. We then created an inbound access rule to allow those IPs in the group access any zone with any port/service. There was no NAT policy created since it doesn’t seem like they need access to a specific device at a specific private IP.
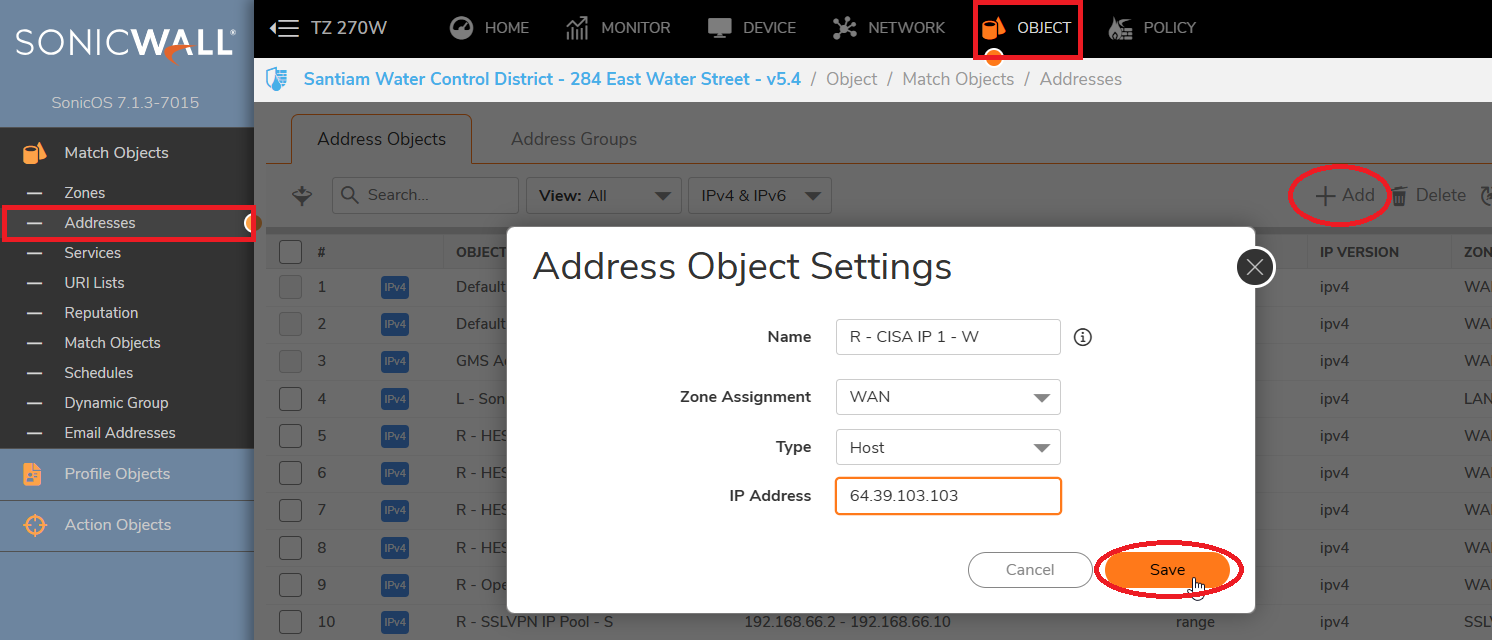
To create these address objects, in the top menu select Object
On the left menu select Addresses
Click Add towards the right side of the Addresses menu
Put a unique name, because the IPs are on the internet select WAN zone, for the first IP select Host because it’s a /32 (255.255.255.255)
For the other IPs, since they are a /29 and /28 network we chose Network and put the corresponding subnet masks under the network IP.
Click Save
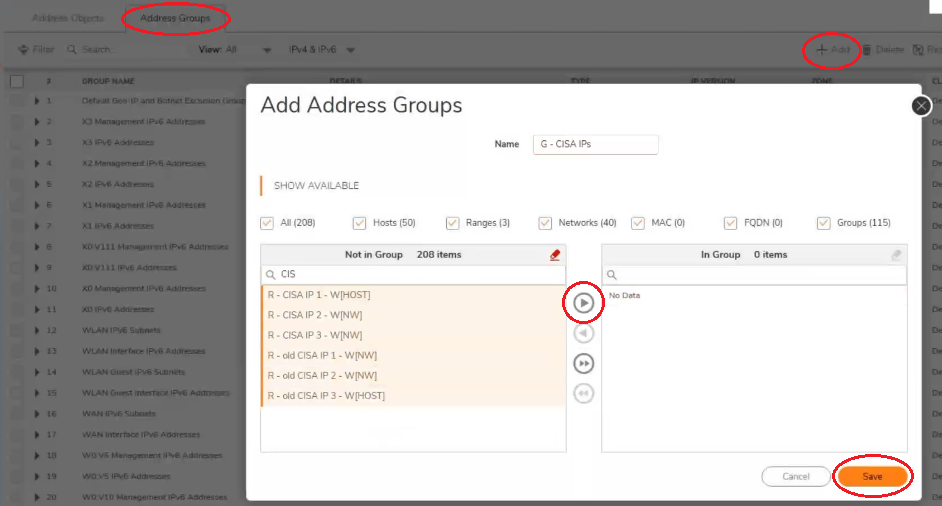
To create an address group, or add new objects to an existing group, click Address Groups at the top left of the Adress Object menu
To create a group Click Add, to edit an existing group search for the group name, hover over it and click the Pencil icon to edit
Search for the address objects you want to add on the left side by the unique name
Select each address object by clicking on each or holding down left click while dragging the cursor over the group of Address objects you wish to select
Click the right facing arrow in the middle to move the selected objects into the group
Click Save
To create access rules, on the top menu navigate to Policy and on the left side menu select Access Rules
Click the +Add option on the bottom left to bring up the screen below.
Since we created an inbound access rule from the internet, we selected WAN for the Source Zone
For the Source Address we selected the group we created which contains the address objects we created.
This locks the rule down to only allow traffic with a source IP from the IP pool in the “G – CISA IPs” group
We left the Destination as Any to allow them open access to the network.
As discussed, I’ll close this ticket for you now but if you have any questions in the future feel free to reach out anytime.